
Complete HWID spoofing guide
Permanent HWID spoofing without the one-click nonsense: motherboard, SSD, NIC, USB, EDID, router and TPM steps with tools and screenshots.
This is the long version. No MachineGuid-and-volume-ID nonsense, no one-click spoofer sales pitch and no pretending a Windows registry edit changed firmware. Work through the hardware you actually own, verify every change, then cold boot and verify it again.
A HWID is not one ID. It is a pile of identifiers that can be compared together: motherboard DMI, drive serials and WWNs, NIC addresses, USB descriptors, monitor EDID, TPM identity, GPU data and the devices sitting around your machine. Leave one obvious old identifier behind and the rest of the work may as well not exist.
You can brick hardware doing this. Make backups before writing anything. A BIOS flash, SSD manufacturing tool or NIC eFuse writer is not the place to guess. If the exact board, controller or chipset does not match, stop.
Downloads and the before-check#
Start by dumping what the machine exposes now. Save the result somewhere off the PC. You need a real before-and-after comparison, not your memory of what a serial looked like.
- HWIDChecker.exe - universal checker.
SHA256 d6f7bc7b338e388b3399eb19bb7010ea671131d2e42d94a1bc939cae261ecd90 - Windows 10 checker script -
SHA256 6451e79bbf6544e13b3a92f03372a16752659460355d85bb6008dfe519acceb7 - Windows 11 checker script -
SHA256 d76c1462abe53df1db72832a58ffc0660f2583558a4e9952b36b6bfcf7b237eb
These built-in commands are also worth saving because they make bad or partial changes obvious:
Get-CimInstance Win32_ComputerSystemProduct | Format-List UUID
Get-CimInstance Win32_BaseBoard | Format-List Manufacturer,Product,SerialNumber
Get-CimInstance Win32_BIOS | Format-List Manufacturer,SMBIOSBIOSVersion,SerialNumber
Get-PhysicalDisk | Format-Table FriendlyName,SerialNumber,UniqueId,BusType
Get-NetAdapter | Format-Table Name,InterfaceDescription,MacAddress,Status
getmac /v
ipconfig /all
nvidia-smi -L
Screenshot the checker and save the text output. Repeat the exact same check after every section. If three things changed when you only meant to change one, find out why before moving on.
Do it in this order#
- Dump every current identifier and make recovery media.
- Motherboard DMI and internal RGB/USB controllers.
- NVMe/SATA identity or a real hardware RAID layer.
- Every enabled network adapter, then the router in front of the PC.
- USB peripherals, monitor EDID, RAM and GPU leftovers.
- TPM last, because clearing it without recovery keys is a very stupid way to lose an encrypted Windows install.
- Shut down, pull wall power, cold boot and run the complete checker again.
Know what you are actually changing#
People say “serial” as if every serial comes from the same place. It does not. A Windows value can be changed in Windows. A descriptor returned by firmware needs a firmware-level change. A serial soldered into a USB device is still there after you clean the registry. Keep the layers straight or you will spend hours proving the wrong thing.
Motherboard#
- System UUID: SMBIOS system information. This is the big obvious one everybody checks.
- Baseboard serial/product: separate SMBIOS board fields. Changing the UUID alone does not touch them.
- BIOS serial/version: another set of firmware fields. Do not randomly edit the version string; it should still match a real release for the board.
- Chassis/enclosure data: OEM machines often fill these with unique values too.
- Internal USB devices: RGB, AIO and lighting controllers sit outside DMI and may expose their own serials.
Storage#
- Device serial and WWN: returned by the drive/controller. A volume-ID tool does not change either one.
- Model and firmware: not normally unique, but they need to stay believable next to the new serial.
- Windows volume ID: belongs to the formatted volume. It is one signal, not the drive identity.
- NVMe namespace/controller identity: another reason a random registry rename is useless.
- SMART history: controller manufacturing tools may reset it. That voids warranty and can make the drive look suspiciously new.
Network#
- Permanent/BIA MAC: stored in EEPROM, eFuse or NIC firmware.
- Current Windows MAC: may be only a driver override. Pull the adapter, reinstall the driver and cold boot to see whether the hardware actually changed.
- USB NIC serial: separate from the Ethernet MAC. Do not change a common shared serial into a unique vanity string.
- Every other radio: Wi-Fi, Bluetooth, WWAN and forgotten USB adapters all count if enabled.
Display, TPM and peripherals#
- EDID: manufacturer, product, manufacture date, timings and optional serial in a 128/256-byte structure with checksums.
- TPM: endorsement identity and platform state. Clearing Windows TPM ownership is not automatically the same as regenerating the hardware-backed identity.
- USB: VID, PID, product string and optional serial are returned by the device. Registry cleanup only removes Windows' cached copy.
If your checker reports a new Windows value while a firmware-aware tool still reports the old one, you made an override. Do not call it permanent.
Motherboard / DMI spoofing#
This section is for AMI firmware that accepts DMIEdit/AMIDEWIN writes. OEM boards and some locked consumer boards need a dumped and modified BIOS instead. ASUS in particular is often more work. Do not keep hammering a locked field with random tools.
What you need#
- DMIEdit Win64 AMI package - the recommended CLI package.
SHA256 4f28ec13c7b6f8a418ab6fbf38fbbc4710bf3097ad228ca4c02fbbd2e7babb6c - DMIEdit GUI 5.27.05.0016 - newer GUI option.
SHA256 c028bc061adf89d0b570e5ac8a438dc484a1d86e3c67a030256f02ff51ebcbd2 - Older DMMIEdit GUI - kept for old boards only. It is unreliable on newer boards.
SHA256 f08ee94dd8d6442f16836c06c9b4eead7150ff3e7a8bfde4ca31bbe1640125b6 - Your exact motherboard BIOS and the vendor's flash/recovery instructions.
Dump the original values#
- Extract
dmi-edit-win64-ami.zip. - Run
1.GET ALL SERIALS.batas Administrator. - Keep the timestamped output. At minimum write down the system UUID, baseboard serial and baseboard product/name.
- Save the current BIOS file and make sure the board's recovery/Flashback method actually works before changing anything.
Prepare sane replacements#
Open 2.CHANGE SERIALS EXAMPLE DONT RUN.bat in a text editor. The filename is not a joke: do not run the example unchanged.
/SU- system UUID. Generate a proper UUID./BS- baseboard serial./BP- baseboard product/name, only if you actually need to change it.
Keep serials looking like the vendor made them. Change two to five characters, preserve the length and character set, and do not put words such as SPOOFER, NULL or your Discord name in firmware.
Original: 08ZU9T1_NAVX2ZXV4F
Changed:  08ZU9T1_NABX12XZ4A
Write, flash and check#
- Review every edited command, then run the batch as Administrator.
- Read the output. A window closing is not proof that the writes succeeded.
- If the board needs it, reflash the same/current BIOS using the vendor procedure and clear CMOS afterward.
- Shut down completely, remove wall power, wait, then cold boot.
- Run the DMI dump and HWID checker again. Confirm the new UUID and baseboard values survived.
If values revert, the firmware is protecting or rebuilding them. Stop there. Using five more versions of AMIDEWIN usually gets you a corrupted DMI table, not a magically supported board.
RGB and internal USB serials#
Changing DMI does nothing to the USB device hidden behind Mystic Light, Aura, an AIO cooler or an internal RGB hub. On Intel boards, disable unused RGB/USB controllers or ports in BIOS where possible. On AM4/AM5, unplug unused RGB headers or use the board's hardware toggle. Dump USB devices again after reboot and make sure the old internal controller did not stay enabled.
NVMe M.2 spoofing - Maxio MAP1202#
This is controller-specific. The retail SSD name is not enough. You need a Maxio MAP1202 controller. Manufacturers swap controllers inside the same product line, so confirm the actual hardware before opening the tool.
Parts and downloads#
- MAP1202 M.2 serial change tool -
SHA256 eaeb2d9a6e537b2dccf0a45d2f87e01093c0481af5a80a23c0c733626905e48f - A compatible MAP1202 SSD. Known options: 512GB, 1TB, 2TB. Coupon
HWIDZEROis 10% and is not an affiliate code. - Other MAP1202 candidates can be found from the Fanxiang S500 family or by searching SSD Tester for
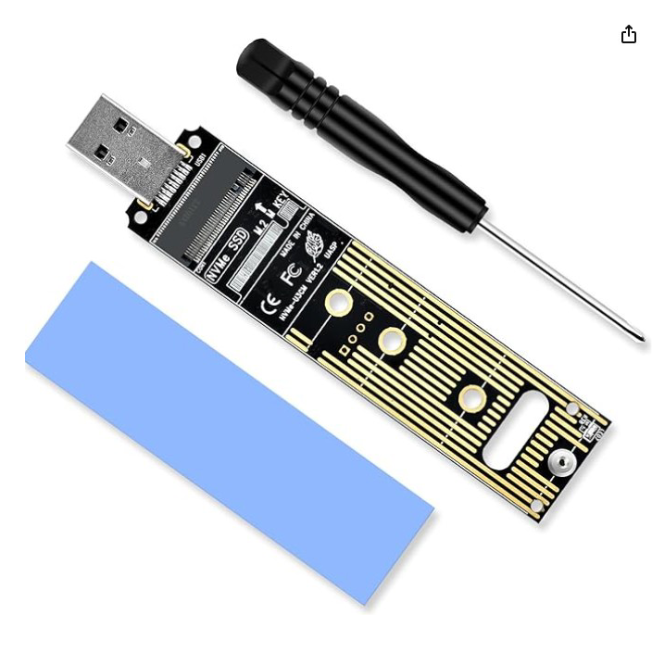
MAP1202. Untested means untested; check the controller. - A USB-to-M.2 adapter using a JMicron JMS583 or another bridge known to pass the required commands. Known adapter example.
- A second PC is strongly preferred. Do not do controller manufacturing work while an anti-cheat is open.
MAP1202 procedure#
- Back up the entire SSD. This procedure can wipe it.
- Install the M.2 drive in the USB adapter.
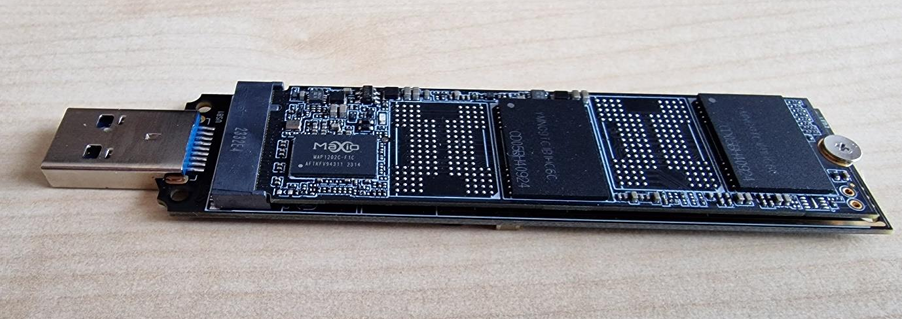
- Connect the adapter to the second PC and wait for the drive/bridge to enumerate.
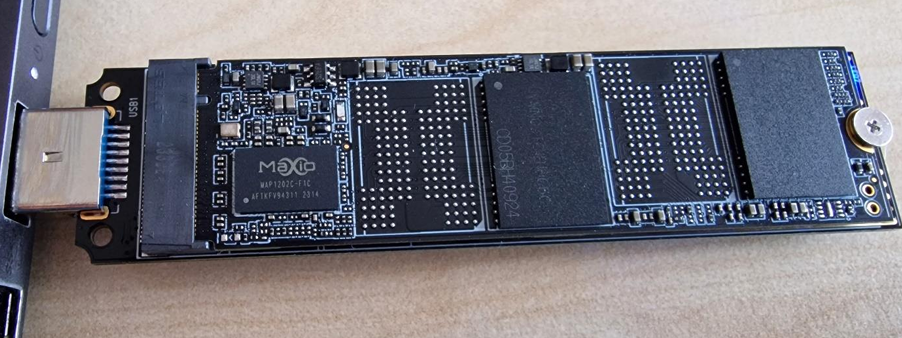
- Open
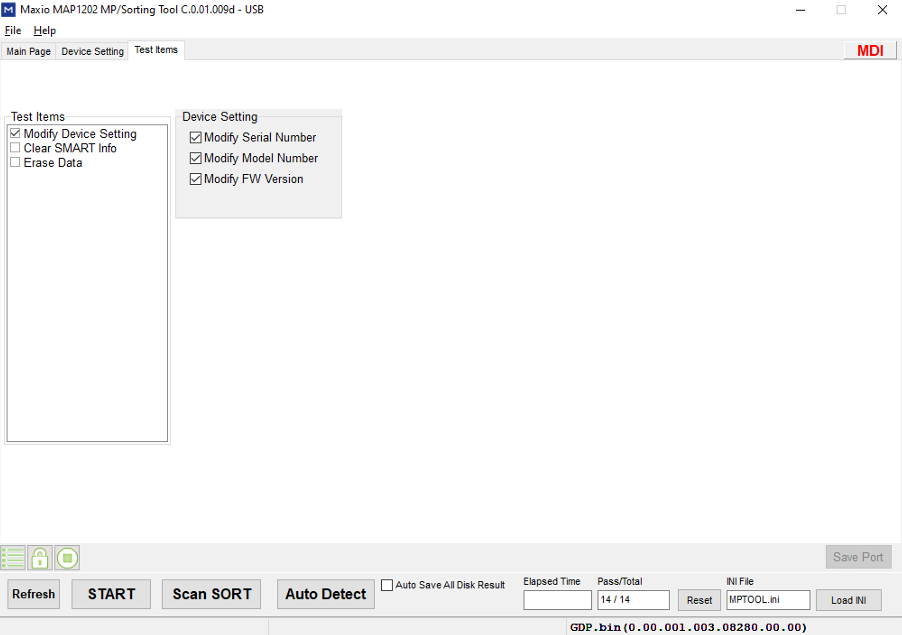
MXMPTool_MAP1202_USB_V0_01_009d.exe. - Go to Test items and configure it exactly like the screenshot.
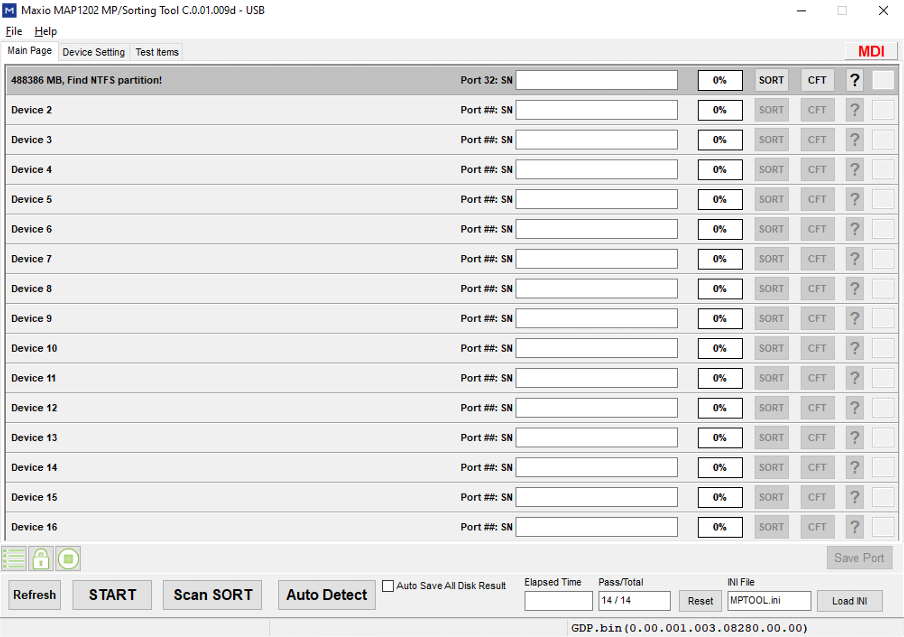
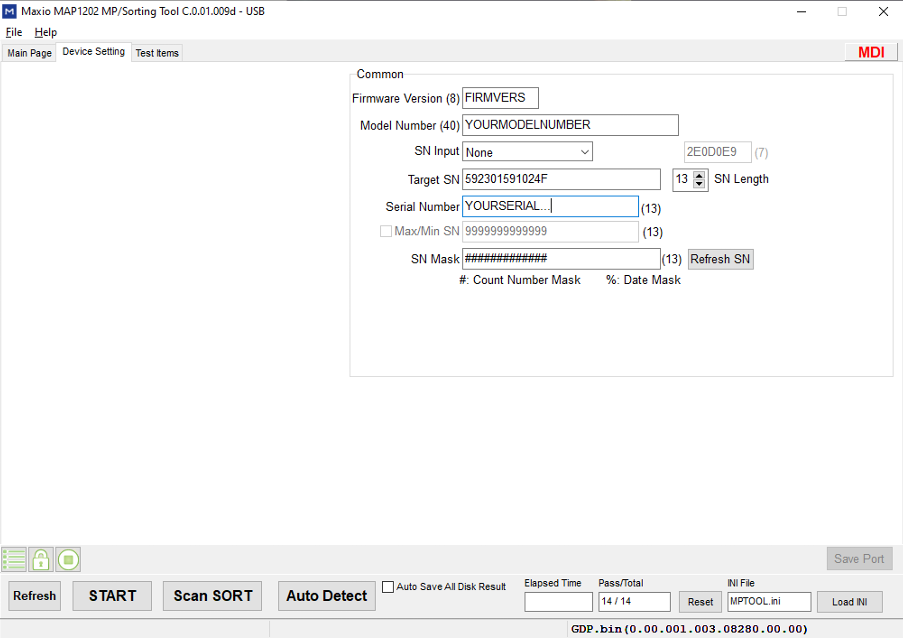
- Open Device Setting.
- Set Firmware Version using numbers only.
- Set Model Number using letters and numbers, maximum twenty characters.
- Set the serial to the exact TARGET SN LENGTH. The default profile uses thirteen characters.
- Return to the main page, select the first port and press Start.
- Wait for the port to turn green. Anything else is not a successful write.
- Disconnect the adapter, shut down the main PC and pull the power cable.
- Reinstall the M.2 drive internally, cold boot and run the checker.
- Verify model, firmware and serial. Reboot once more and verify persistence.
SATA 2.5-inch SSD spoofing - YANSEN#
This procedure is for compatible YANSEN-controller SATA SSDs and a SATA-to-USB bridge using the ASMT 2115 chipset. If the tool cannot identify the controller, that is your answer. Do not force it.
Parts and downloads#
- SATA SSD serial change tool -
SHA256 95c6e0c0670eabeafeace7850fedc484453d76716d81f289e232d9a496dcca20 - Known compatible SSDs: 1TB, 2TB, 4TB. Coupon
HWIDZERO. - Some KingSpec drives use the right controller, but the controller must still be checked.
- SATA-to-USB adapter with ASMT 2115.
YANSEN procedure#
- Back up the drive, install it in the SATA-to-USB adapter and connect it to the second PC.
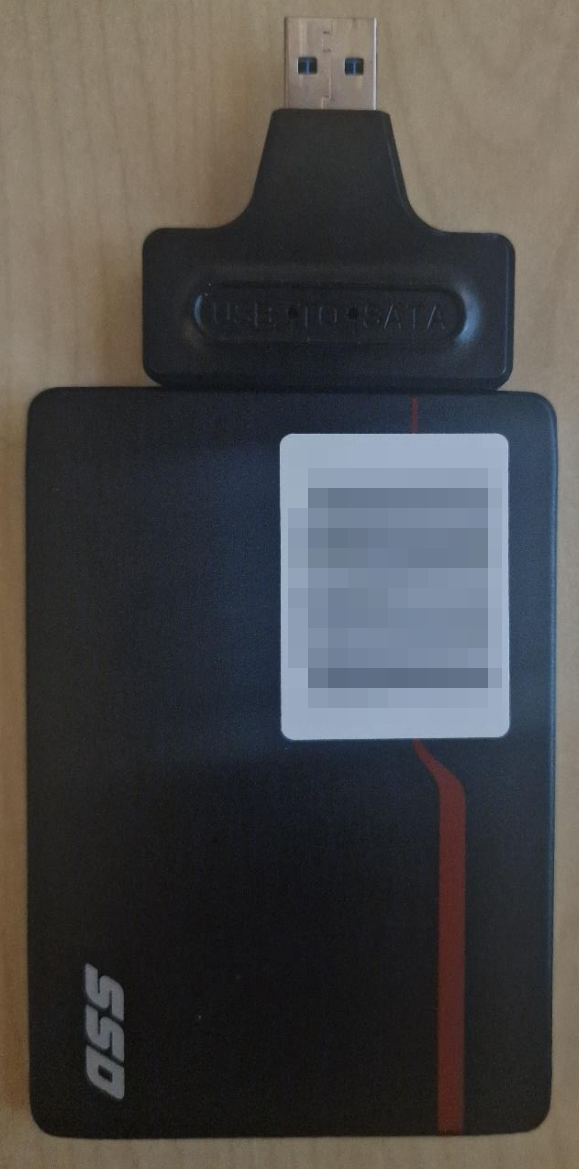
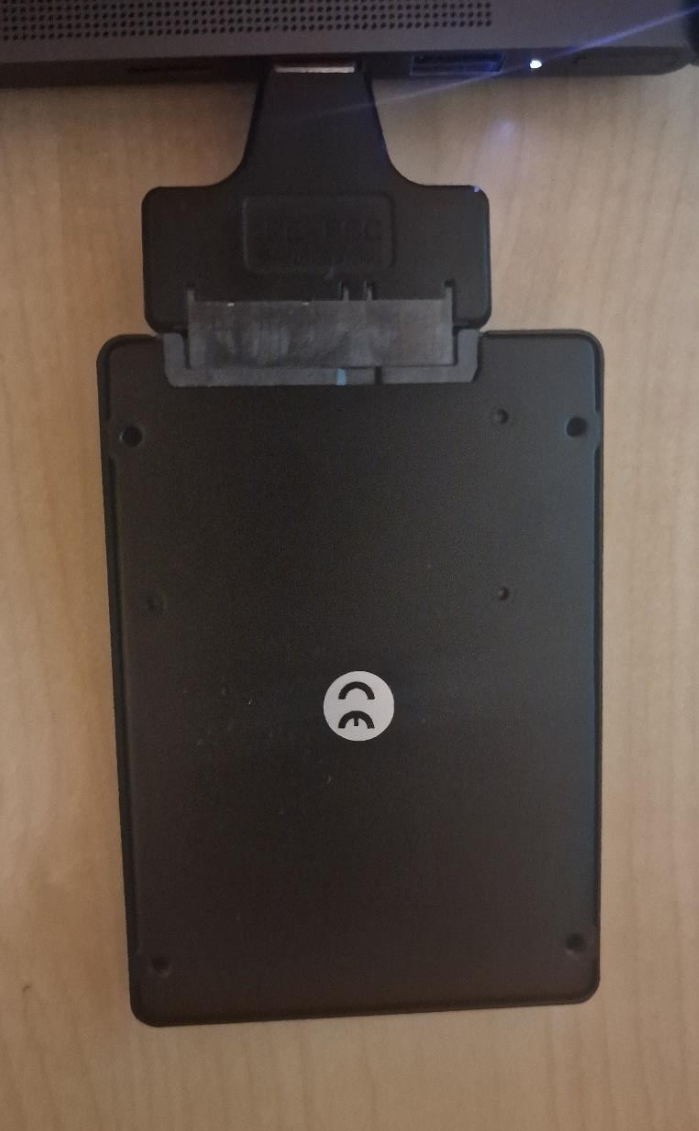
- Open
SSDToolKits.exe. - Use the top dropdown to select the SSD. If it is not there, fix the bridge/connection or stop.
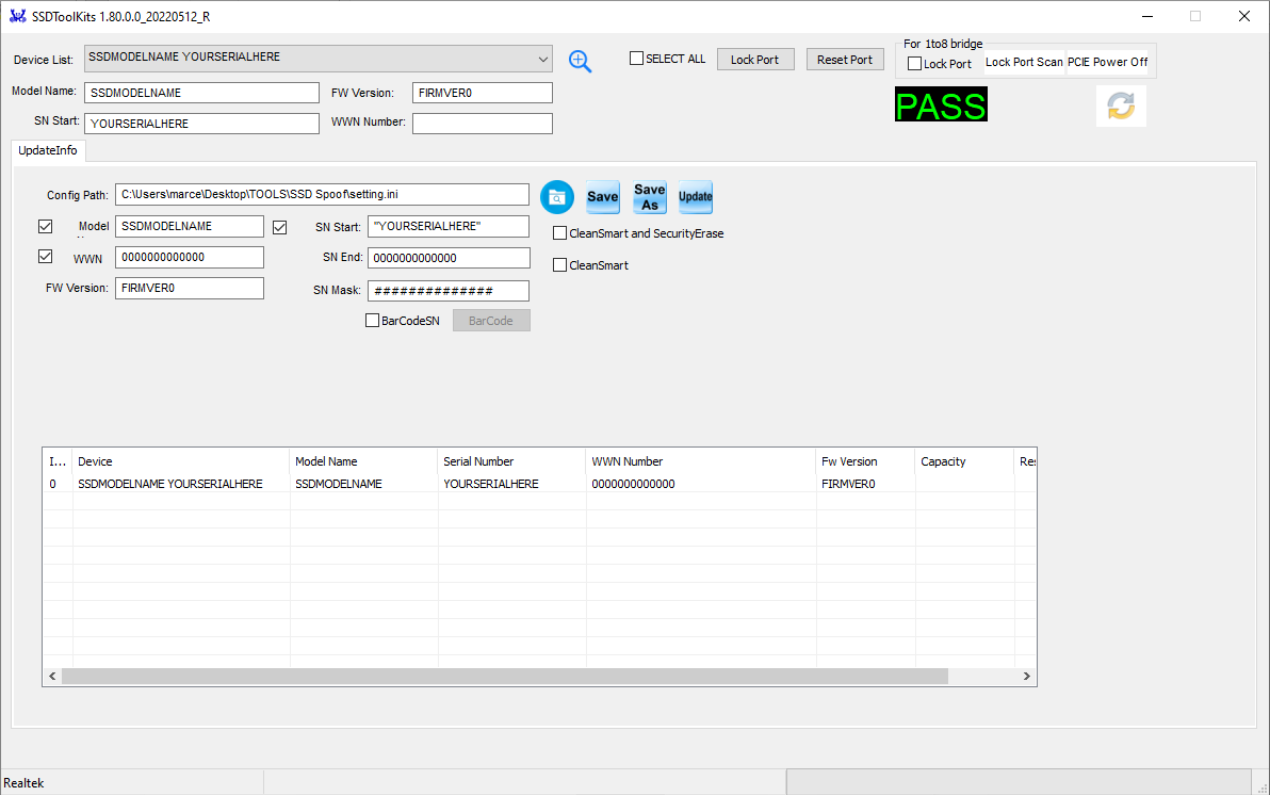
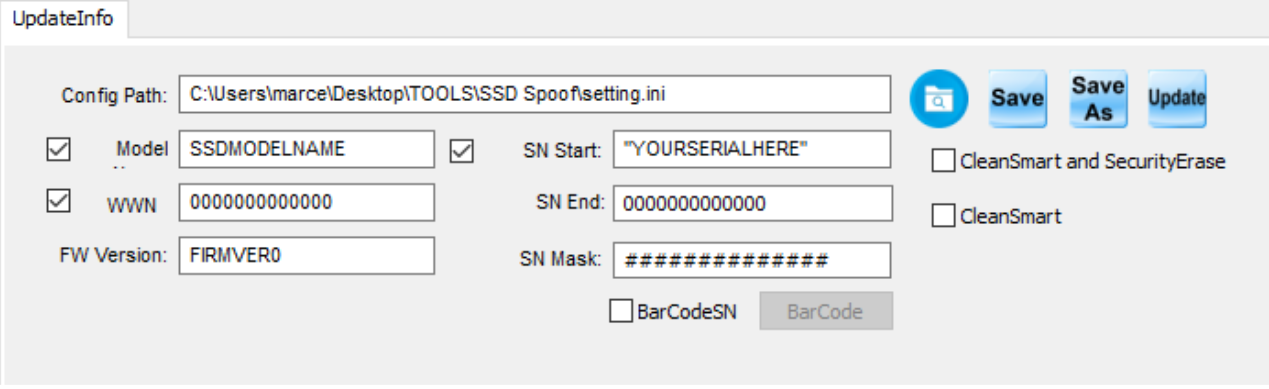
- Enter a numeric firmware version.
- Enter an alphanumeric model, maximum twenty characters.
- Enter a serial within TARGET SN LENGTH, normally thirteen characters.
- WWN is optional, but if you change it, keep the expected length and format.
- Press Save, then Update.
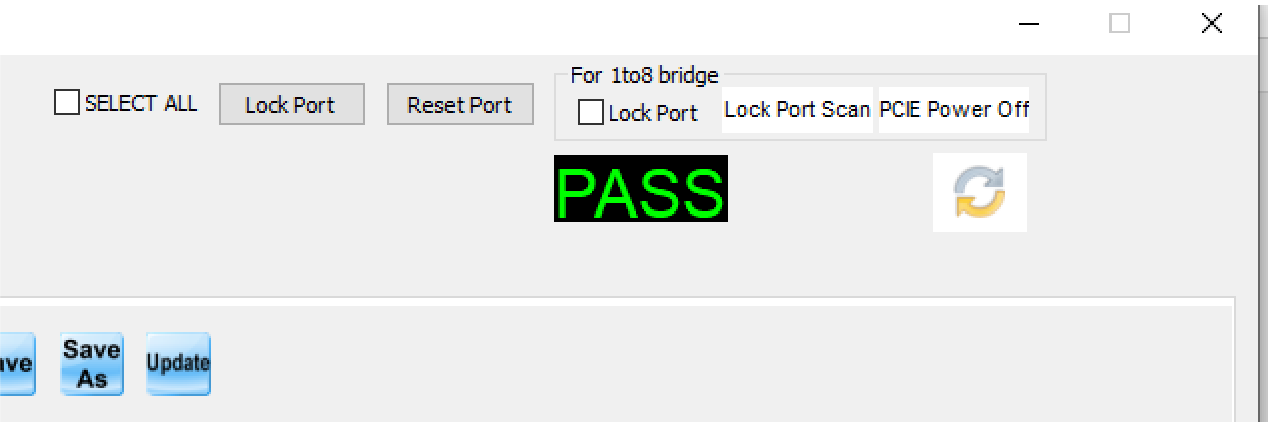
- Wait for PASS in the top-right corner.
- Disconnect the adapter. Shut down and fully unplug the main PC.
- Reinstall the SATA SSD, cold boot and verify model, firmware, serial and WWN.
Hardware RAID#
A proper hardware RAID card can hide the individual drive identity behind a virtual disk. Examples are the S322M225R for M.2 or LSI/MegaRAID cards for SATA/SAS. Windows Storage Spaces, motherboard fake-RAID and a random RAID0 toggle are not automatically the same thing. Check what Windows can still query. If the member serials are still visible, the drives are not hidden.
NIC spoofing#
Disable adapters you do not use. Spoofing Ethernet while the original Wi-Fi and Bluetooth adapters stay enabled is half a job. Before writing any card, save its original MAC and firmware/config dump.
For normal Intel, Realtek and USB adapters, keep the first six hex digits (the vendor OUI) and change the last six. Do not use somebody else's example MAC. Mellanox firmware is covered separately below.
Pick the right NIC method#
- Intel onboard/PCIe, usually 1GbE: hardest of the common options. DOS boot, EEUPDATE and temporary BIOS changes. Some chipsets simply refuse the write.
- Realtek onboard/PCIe, 1-2.5GbE: medium difficulty. Pick the right controller CFG and eFuse programmer; trial and error is normal, blind writing is not.
- Mellanox ConnectX-3, 10GbE SFP+: easy commands once the right used card and old WinOF stack are installed. Full image backup and restore are possible.
- Realtek USB 2.5GbE: easiest option when the adapter has a supported public CFG. Dump, program, unplug/replug.
- ASIX AX88179 USB 1GbE: easy and widely available. A/B revisions need the Captain tool.
If the internal NIC is a pain, disable it in BIOS and use a verified USB adapter. That is cleaner than leaving a half-working firmware write on the board.
Intel NIC - EEUPDATE from DOS#
Download EEUPDATE 5.35.12.0 - SHA256 78b3bd7d88d37f1533c769e5231c40dbd6ef6c896fd58ffc84edfa5808f68918. You also need Rufus and a USB stick.
- Create an MS-DOS boot USB in Rufus.
- Copy
EEUPDATE.exeto the USB. - Create
changemac.baton the USB:
@echo off
echo Current adapters
EEUPDATE /LIST_NIC
echo Current MAC
EEUPDATE /NIC=1 /MAC_DUMP
pause
echo Writing MAC
EEUPDATE /NIC=1 /MAC=REPLACEMEWITHMAC
echo New MAC
EEUPDATE /NIC=1 /MAC_DUMP
pause- Replace
REPLACEMEWITHMACwith twelve hex digits. UseEEUPDATE /LIST_NICfirst;/NIC=1is only correct if the target really is adapter one. - In BIOS, temporarily disable Secure Boot and enable CSM if the DOS USB requires it.
- Boot the USB, run
changemac.batand compare the before/after dump. - Remove the USB, restore the BIOS settings, boot Windows and verify with
getmac /vandipconfig /all.
Not every Intel NIC or EEUPDATE build supports this. If /LIST_NIC does not show the adapter correctly, do not guess a device index and write anyway.
Realtek PCIe - eFuse programmer#
- RealTekNicPgW 2.7.5.0 -
SHA256 3181508a22cff05c76b202edf8ff58141cd6e9e551233d16b86bbfdf3d4ed48e - Alternative Realtek eFuse package -
SHA256 05229993bc26fe7c0ba3f803598cd365a9d80aa8da844857573386eda657867c
- Extract the package that matches the controller family.
- Open
8168FEF.CFGand edit the firstNODEIDline:
NODEID = 00 E0 4C 88 00 18
;ENDID = 00 E0 4C 68 FF FF- Run
WINPG64.BATas Administrator. - Require
PG EFuse is Successful!!!, the correct NodeID and a sensible remaining eFuse byte count. - Reboot and verify the physical address with
ipconfig /all.
eFuse space is finite. The output tells you how many bytes remain. Do not sit there rewriting the card for fun; eventually the flash/eFuse area is full.
Realtek USB 2.5GbE#
Download Realtek USB PG Tool pack - SHA256 f21a9fa035bdec264b4cb49e65fa4fc4bf67aa8e54b9b2f80aff019ce2d42eed. Use LATEST_PUB_WIN_USB_PGTOOL_v2.0.22_V2; the older folders are there for odd chipsets, not because you should start with them.
A known working option is the Uni USB-C 2.5GbE adapter (Amazon DE). Some UGREEN adapters use missing/custom CFG or eFuse layouts and do not work with this package.
- Run the USB PG tool as Administrator.
- Select the correct device and set mode to EFUSE.
- Click DUMP. Do not program until the read returns PASS.
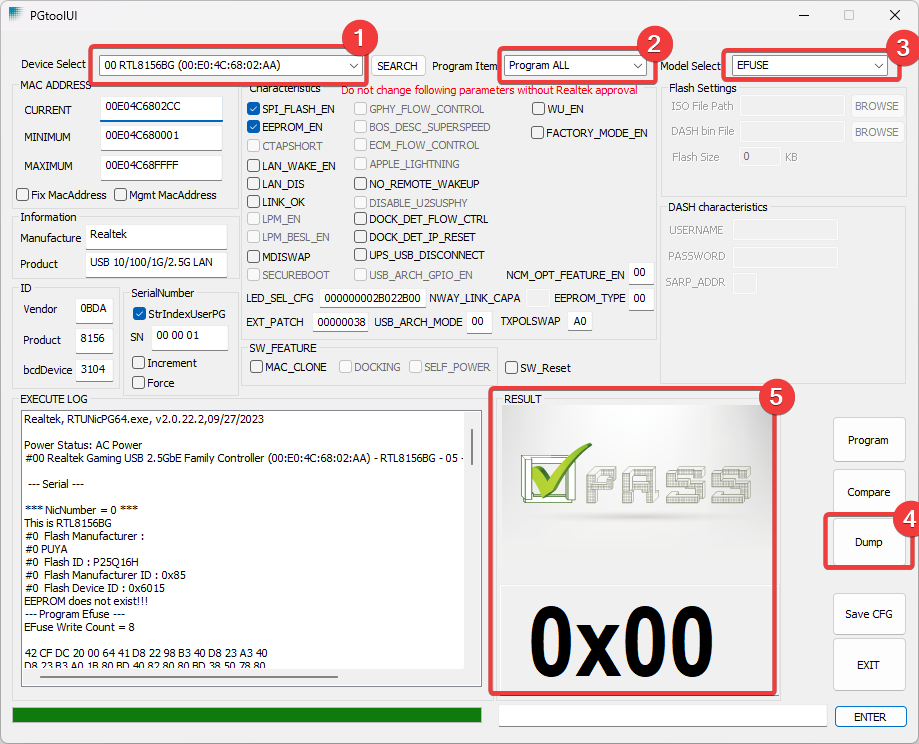
- Set CURRENT MAC, preserving the vendor OUI.
- Click PROGRAM and require PASS.
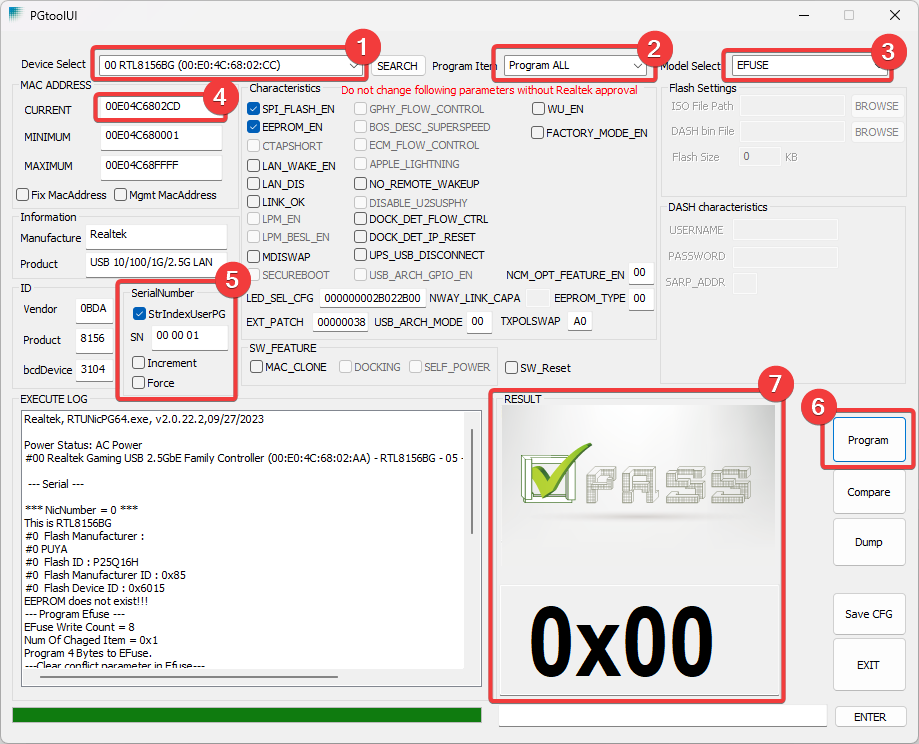
The tool can change the USB serial too. Usually leave it alone. Many units share a boring common serial such as 4013; replacing that with a unique custom string can make the adapter stand out more, not less.
ASIX AX88179 / AX88179A / AX88179B#
- ASIXFlash -
SHA256 f45cf51c8ab3e00f04236d1f7ad20c87de625dcc6f680128520adc20e9d2c083 - Captain Mac Tool - password
captaindma.SHA256 4360f0b23f85afec934abae28090d9cb15c2292c9f3ace8559b6c1f44ddcf97b
- Extract and run the tool as Administrator.
- Back up EEPROM/config if the tool offers it.
- Program a MAC that keeps the original OUI.
- Unplug/replug the adapter and verify.
The A/B revisions generally need Captain Mac Tool. If the write reverts or the adapter is not detected, it is likely locked or unsupported. Stop instead of trying random firmware.
Mellanox ConnectX-3 - permanent firmware MAC#
This exact procedure was tested on a single-port CX311A / MCX311A-XCAT: PCIe x4, PSID MT_1170110023, FS2 image, device ID 4099, firmware 2.33.5220. It is a firmware change, not a Windows override, and the card accepts repeated MAC changes.
- WinOF 5.50.53000 - use WinOF, not WinOF-2.
SHA256 d3b247d88e8aca30265db6e20d11ee937fc710d3c008241b60674126005f7c73 - WinMFT 4.13.3 -
SHA256 e062029c88227d1bb11279335889f9e3d42f60d7bce6ad1bd70be4097e223df4
ConnectX-3 is on the old WinOF branch. WinOF-2 is for ConnectX-4 and newer. The installer saying Win2019 does not stop this tested package from working on Windows 10/11.
Install and find the device#
- Install WinOF first. Reboot if asked.
- Install WinMFT. Default path:
C:\Program Files\Mellanox\WinMFT. - Open PowerShell as Administrator:
cd "C:\Program Files\Mellanox\WinMFT"
.\mst.exe status -v
The tested card appears as mt4099_pci_cr0 and mt4099_pciconf0. Use mt4099_pci_cr0 for the commands below.
.\flint.bat -d mt4099_pci_cr0 q
getmac /v
Get-NetAdapter | Format-Table Name,InterfaceDescription,MacAddress,Status,LinkSpeed
The Port1 MAC from flint must match the Windows-visible physical address before you touch anything. A single-port card still shows Port1 and Port2 values; Port2 is stored as base+1.
A healthy query for the tested card looks like this:
Image type:            FS2
FW Version:            2.33.5220
Product Version:       02.33.52.20
Device ID:             4099
Description:           Node             Port1            Port2            Sys image
GUIDs:                 ffffffffffffffff ffffffffffffffff ffffffffffffffff ffffffffffffffff
MACs:                                       e41d2da1b2c0     e41d2da1b2c1
PSID:                  MT_1170110023
If your PSID, image type or device ID is different, stop copying the example blindly. Query the card you have and keep its own values.
Back up and test the edit offline#
.\flint.bat -d mt4099_pci_cr0 ri cx311a-backup.bin
Copy-Item .\cx311a-backup.bin .\cx311a-test.bin
Keep cx311a-backup.bin somewhere safe. Test the new address against the copied image before touching the card:
# Example only: original E4:1D:2D:A1:B2:C0 -> test E4:1D:2D:A1:B2:C2
.\flint.bat -i .\cx311a-test.bin -mac 0xE41D2DA1B2C2 sg
.\flint.bat -i .\cx311a-test.bin q
The query should show Port1 ending in C2 and Port2 ending in C3. Restoring signature - OK is the expected result.
Flash the card#
.\flint.bat -d mt4099_pci_cr0 -mac 0xE41D2DA1B2C2 sgConfirm the old/new values at the prompt. The two success lines you want are:
Burning FS2 FW image without signatures - OK
Restoring signature                     - OK
The warning about re-burning the image with new GUIDs is normal here; existing GUIDs are preserved.
shutdown /r /t 0After reboot, query with flint, getmac /v, ipconfig /all and Get-NetAdapter. All of them should show the same new Port1 MAC and the link should return at its normal speed.
Choosing the final Mellanox MAC#
The one-nibble change above is a low-risk proof that the procedure works. For the final address you have two sensible options:
- Keep the Mellanox OUI: change only the final three bytes. It looks like the same make of card on a normal network.
- Use a locally administered address: start with
02, for example02:11:22:33:44:55. That is the IEEE-correct way to assign your own address and avoids stealing a real vendor-issued MAC.
Port2 is always base+1, so 02:11:22:33:44:55 becomes 02:11:22:33:44:56 for the stored second value.
.\flint.bat -d mt4099_pci_cr0 -mac 0x021122334455 sgBoth styles work technically. Pick one and stay consistent. Do not use the exact example address above.
Changing it again and restoring the backup#
# Change again
cd "C:\Program Files\Mellanox\WinMFT"
.\flint.bat -d mt4099_pci_cr0 -mac 0xNEWMAC sg
shutdown /r /t 0

# Full restore from the saved image
cd "C:\Program Files\Mellanox\WinMFT"
.\flint.bat -d mt4099_pci_cr0 -i cx311a-backup.bin b
shutdown /r /t 0
Do not use bb, -ocr, random firmware images, cross-flash instructions or low-level erase commands for this job. Do not update working firmware just because another guide tells you to. Test the edit on the image file first.
Mellanox troubleshooting#
mstflintnot found: this Windows install usesflint.bat, which callsflint_ext.exe.mst status -vempty: reinstall WinOF, reboot, reinstall WinMFT and run the shell as Administrator.- Windows sees the card but flint fails: use the
pci_cr0device, notpciconf0. - Port2 changed too: normal. It is derived from the base MAC.
- Link drops after flash: check the Windows driver and SFP+/RJ45 transceiver first. The MAC command should not require a firmware upgrade.
- Only
pciconf0works: do not continue from a copied command. Re-check the MFT driver/device state and make a full query before any write. - Wrong PSID or FS image: do not cross-flash to make the guide match your card.
GPU, RAM and USB devices#
GPU#
NVIDIA exposes its UUID with nvidia-smi -L. There is no clean public permanent UUID method worth recommending. Random driver hooks sold as “GPU spoofing” are not permanent firmware changes and can create more problems than they solve. AMD does not expose the same public UUID, although model and driver data still exist.
RAM#
There is no reliable public method I would tell you to run on random RAM. Buy memory that already exposes null/non-unique serials. Corsair DDR4/DDR5, GEIL DDR4/DDR5 and G.Skill Trident Z DDR4/DDR5 are common options, but check the actual kit before assuming.
USB peripherals#
USB serials come from the device descriptor. Deleting a registry key does not hide a serial the device returns over USB. Use USBDeview to inventory them. Roccat/Turtle Beach, Xtrfy and many Razer keyboards/mice commonly have no unique USB serial, but check your exact device. Some generic UDisk sticks return 00000000.
Unplug anything with a hardcoded serial you cannot change. That includes forgotten Bluetooth dongles, RGB controllers, capture devices and internal USB hubs.
Monitor EDID#
Your monitor can expose a serial inside EDID. Multi-monitor means multiple EDIDs. Dump every one with Monitor Asset Manager and save the original BIN files.
- A fuser/capture device may support a custom EDID. Follow its exact manual.
- For a monitor outside the fuser path, use a hardware emulator such as Dr.HDMI 4K.
- Edit with a hex editor such as HxD, but fix the EDID checksum. Changing only the visible serial and leaving a broken checksum is an easy fingerprint.
Do not forget the second monitor. Do not assume a capture card rewrites EDID unless its software is actually set to present the custom file.
Router and ARP isolation#
Use a small GL.iNet router running OpenWrt, or flash a supported router from the OpenWrt hardware list.
- Change the router hostname.
- Change the router MAC and the MAC of the physical port/interface used by the target PC. These are not always the same address.
- Plug only the target PC into the isolated router LAN.
- Connect that router's WAN to the normal home router.
- Do not put random phones, consoles and TVs on the isolated LAN. The point is a clean ARP table.
These static multicast/broadcast entries are normal Windows noise, not unique devices:
224.0.0.22       01-00-5e-00-00-16  static
224.0.0.236      01-00-5e-00-00-ec  static
224.0.0.251      01-00-5e-00-00-fb  static
224.0.0.252      01-00-5e-00-00-fc  static
192.168.8.255    ff-ff-ff-ff-ff-ff  static
239.255.255.250  01-00-5e-7f-ff-fa  static
255.255.255.255  ff-ff-ff-ff-ff-ff  static
The router does not spoof the PC's NIC. Do both jobs.
TPM#
Save BitLocker recovery keys and suspend/decrypt BitLocker before changing TPM state. Otherwise you can lock yourself out of the install you just spent hours preparing.
fTPM is the better option for strict checks. A random discrete TPM is not some invisible golden ticket, and some checks explicitly dislike the swap.
Intel fTPM regeneration by BIOS Flashback#
This method needs an Intel board with a dedicated BIOS Flashback USB port and physical Flash button. MSI Z790 is tested; many Intel boards from the 11th-gen era onward use the same general idea. It does not apply to AMD the same way.
- Read the board manual. Use the exact Flashback USB port, filesystem and firmware filename.
- Put the correct BIOS on the USB stick.
- Shut the machine down and use the physical Flashback button.
- Let the board rewrite completely. Do not interrupt power.
- Boot, verify TPM state and only then re-enable/re-provision Windows security features.
dTPM - not recommended#
The basic swap is simple: buy the exact TPM module for the board header, install it, disable fTPM and enable dTPM in BIOS. Simple does not mean good. The module becomes another stable piece of hardware and is a known flag in stricter environments.
Final verification - do not skip this#
- Run HWIDChecker and every command from the first section.
- Compare the result against the original dump line by line.
- Disable or remove any leftover adapter, USB device or display exposing old data.
- Shut down, pull wall power for thirty seconds and cold boot.
- Run the whole check again. Warm-reboot-only changes do not count.
- Make sure serials are plausible, unique where they should be, the correct length and not stupid placeholder text.
Green/PASS in the writing tool is only half the check. The only result that matters is what Windows sees after a cold boot.
Use a simple before/after sheet#
Component            Before                  After                   Cold boot
System UUID          ____________________    ____________________    PASS / FAIL
Baseboard serial     ____________________    ____________________    PASS / FAIL
BIOS serial          ____________________    ____________________    PASS / FAIL
NVMe/SATA serial     ____________________    ____________________    PASS / FAIL
WWN / unique ID      ____________________    ____________________    PASS / FAIL
Ethernet MAC         ____________________    ____________________    PASS / FAIL
Wi-Fi MAC            ____________________    ____________________    DISABLED / PASS
Bluetooth            ____________________    ____________________    DISABLED / PASS
USB serials          ____________________    ____________________    PASS / FAIL
Monitor EDID serial  ____________________    ____________________    PASS / FAIL
TPM state            ____________________    ____________________    PASS / FAIL
“Unreadable” is not automatically a pass. Work out whether the device is genuinely hidden/disabled or whether the checker simply failed.
When something does not stick#
DMI changed, then came back#
The board rejected the write, restored a backup DMI region or rebuilt values after the flash. Confirm the firmware family, look for vendor write protection and check whether that board needs a modified BIOS image. Stop rotating AMIDEWIN versions after the first few controlled tests.
SSD tool sees the bridge but not the controller#
The USB bridge may enumerate while blocking the vendor command set, or the SSD is not the controller you thought it was. Check JMS583/ASMT 2115, cable/power and the actual drive controller. Do not click Start on an empty/wrong port.
SSD reports PASS but Windows shows the old serial#
Power the drive all the way down. A controller can keep the old identify data cached through a warm reboot. If a cold boot still shows the old value, confirm you wrote the right port/profile and compare protocol-level output, not Device Manager's cached label.
MAC changed in Windows but firmware dump is old#
You made an OS/driver override. That may disappear on driver reinstall or adapter reset. Use the vendor/eFuse/firmware path for the card or disable it and use a supported adapter.
USB serial vanished only after registry cleanup#
Plug the device into a clean USB port or another PC. If the serial returns, it was only removed from Windows' cache. The device never changed.
EDID file is rejected or the display disappears#
The block length, extension count or checksum is wrong. Go back to the original BIN, edit only the intended bytes and recalculate the checksum for every 128-byte block. Do not feed a broken file to every display in the setup.
BitLocker asks for recovery after TPM work#
That is exactly why the recovery key was the first step. Use it, boot, then re-provision BitLocker/Windows Hello against the new TPM state. Do not keep clearing TPM and hoping the prompt goes away.
Common ways people waste their time#
- Changing
MachineGuid, volume IDs and registry device entries, then calling it permanent HWID spoofing. - Running a temporary spoofer on top of DMA and trusting its marketing screenshot.
- Changing Ethernet while Wi-Fi, Bluetooth and a USB NIC still expose the old machine.
- Using somebody else's example MAC verbatim.
- Putting
000000,SPOOFERor obvious random garbage in every DMI field. - Flashing a drive because the product name looks right without checking the controller.
- Skipping firmware backups and discovering the recovery problem after the card disappears.
- Clearing TPM before saving BitLocker recovery material.
- Verifying only after a warm reboot.